When setting up your domain with Hawk Host hosting services and managing your email through private email, properly configuring your DNS settings is crucial for ensuring smooth operation. This guide will walk you through configuring your DNS settings in Cloudflare for Hawk Host hosting, including activating your domain and setting up private email.
Prerequisites
Before proceeding, make sure you have access to your Cloudflare account and have already added your domain to Cloudflare’s DNS management platform. Additionally, ensure you have the necessary login credentials for your Hawk Host cPanel and private email service.
Step 1: Access Cloudflare DNS Management
1. Log in to your Cloudflare account.
2. Navigate to the “DNS” section for the domain you want to configure.
Step 2: Add DNS Records
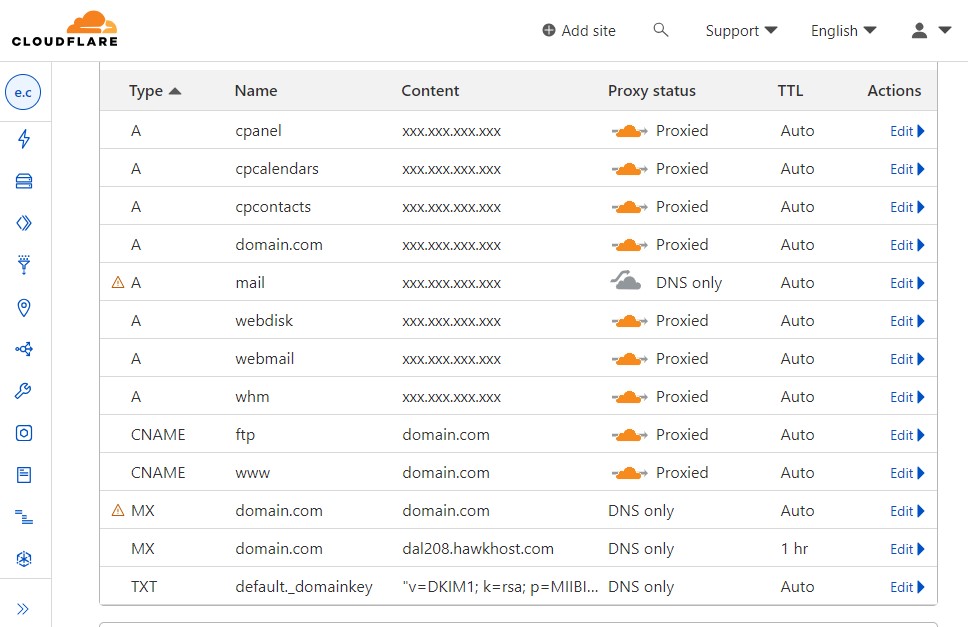
Follow these steps to add the required DNS records:
A Records
– cpanel: Point to your Hawk Host cPanel IP address. Set Proxy status to “Proxied”.
– cpcalendars: Point to your cPanel calendars IP address. Set Proxy status to “Proxied”.
– cpcontacts: Point to your cPanel contacts IP address. Set Proxy status to “Proxied”.
– domain.com: Point to your website’s IP address. Set Proxy status to “Proxied”.
– mail: Point to your mail server’s IP address. Set Proxy status to “DNS only”.
– webdisk: Point to your web disk IP address. Set Proxy status to “Proxied”.
– webmail: Point to your webmail IP address. Set Proxy status to “Proxied”.
– whm: Point to your WHM IP address. Set Proxy status to “Proxied”.
CNAME Records
– ftp: Create a CNAME record pointing to your domain (e.g., domain.com). Set Proxy status to “Proxied”.
– www: Create a CNAME record pointing to your domain (e.g., domain.com). Set Proxy status to “Proxied”.
MX Records
– domain.com: Set the mail exchange (MX) record to point to your domain (e.g., domain.com). Set Proxy status to “DNS only”.
– domain.com: Set another MX record with priority and value pointing to your HawkHost mail server (e.g., dal208.hawkhost.com). Set Proxy status to “DNS only”.
Step 3: Verify and Save
– Double-check all DNS records for accuracy, including IP addresses, hostnames, and proxy status.
– Once verified, click on “Save” or “Done” to apply the changes.
Conclusion
Configuring DNS settings correctly is essential for ensuring that your domain, email, and other services function smoothly with Hawk Host hosting. By following these steps and properly configuring your DNS records in Cloudflare, you can effectively manage your domain and private email services. If you encounter any issues, don’t hesitate to reach out to Cloudflare support or consult Hawk Host’s documentation for further assistance.
Remember to periodically review and update your DNS settings as needed to accommodate any changes in your hosting setup or email configuration. With the right DNS configuration, you can optimize the performance and reliability of your website and email services hosted with Hawk Host.